
UPDATE:
________
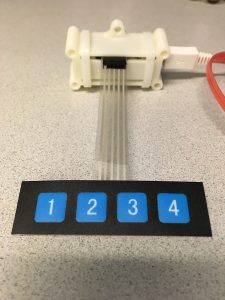
I have now added a 4 button pad to the Arduino setup. This allows you to preload and run 4 separate scripts
Here is the new code:
______
Sometimes you are tasked with typing a whole lot of terminal commands. This is especially frustrating if you are doing it in Single User Mode, as there is no relief to be found from copying and pasting. Some Arduino systems, such as the Micro can be loaded with a special library called HID-Project, which will allow them to output text over USB like a standard keyboard would. HID-Project can be found in the Arduino library manager, and is easy to implement.
Here is an example:
#include <HID-Project.h>
#include <HID-Settings.h>void setup() {
// put your setup code here, to run once:
BootKeyboard.begin();
delay(500);
}void loop() {
// put your main code here, to run repeatedly:
BootKeyboard.println(“csrutil enable –without nvram\n”);
BootKeyboard.println(“csrutil netboot add 192.168.1.1\n”);
BootKeyboard.println(“csrutil netboot add 192.168.1.2\n”);
BootKeyboard.println(“csrutil netboot add 192.168.1.3\n”);
BootKeyboard.println(“nvram -d boot-args\n”);
BootKeyboard.println(“bless –device /dev/disk0s2 –setBoot\n”);
BootKeyboard.println(“/Applications/Utilities/\”Firmware Password Utility.app\”/Contents/Resources/setregproptool -p myfirmwarepswd -m command\n”);
BootKeyboard.println(“reboot\n”);
while (1);
}
note: the \n carriage return is not truly necessary, but I like the extra separation it gives while watching it run.
**Bonus**
You can reboot your machines using ARD with the following command. You may need to change the disk if you have a different setup.
nvram boot-args=”-s” && bless –device /dev/disk0s3 –setBoot && shutdown -r now
More info on the VM disk creation: